Posts Tagged ‘mozzarella cheese’

h1

More Adventures in Healthy Bread: Sandwich Loaves, Buns, and Apple Bread

February 3, 2010
Braised pork on whole wheat buns with micro greens

Slow Cooker Herbed Pork Sandwiches

[Jump right to the recipes: Cinnamon Toast & Slow Cooker Herbed Pork Sandwiches

I’m happy to report that in January I stuck with my 2010 culinary resolution to learn how to bake bread. A couple of weeks ago I shared with you my first foray into this adventure: making the master recipe from Jeff Hertzberg and Zoe Francois book Healthy Bread in Five Minutes a Day. My experiences (experiments?) proved that indeed homemade bread is possible with just a few minutes active effort at any given time. I was generally happy with my results and with the encouragement of my family I’ve persevered. I continue to be well-supported by the baking group so wonderfully organized by Michelle from Big Black Dogs. In short – I’m hooked! 

Soft Whole Wheat Sandwich Bread*

The baking group’s second assignment was to make the Soft Whole What Sandwich Bread recipe and turn out three different creations: 

  • A loaf of bread baked in a traditional loaf pan
  • Hot dog or hamburger buns
  • Apple strudel bread

I’m happy to report that I made all three different applications of the dough and had a thoroughly fun time with each. Thus far this dough is my favorite to make, work with, and eat. 

*As a reminder, all of the bread recipes the baking group is following can be found in Healthy Bread in Five Minutes a Day. We’ve agreed not to republish them online but you can pick up a copy of the book for less than $20. Also, I’ll be giving a copy of the book away later this month, so you can try to win a copy then. Following Michelle’s great example I’m sharing a recipe that goes well with our bread as part of this post, so you won’t feel recipe deprived. 

Making the Dough

The sandwich bread dough recipe has nine ingredients instead of the 6 in the master loaf, so it took just a little bit longer to make: 13 minutes instead of 11. Because these branded ingredients worked so well for me for the master recipe I stuck with them for this recipe as well: 

  • King Arthur Whole Wheat and unbleached AP Flour
  • Hodgeson Mill vital wheat gluten

I did double the salt in this recipe based on my experience with my first batch of dough and the little extra helped enhance the flavor of all of the breads I made. I once again measured the ingredients by volume using my kitchen scale, which probably adds a couple of minutes to the process but it’s worth it. I mixed the dough by hand again because it was so easy last time, and once again with just a little elbow grease the mixture came together quickly. 

Soft Whole Wheat Sandwich Bread Dough

Soft Whole Wheat Sandwich Bread dough - just mixed

The dough rose beautifully as well, as you’ll see below. 
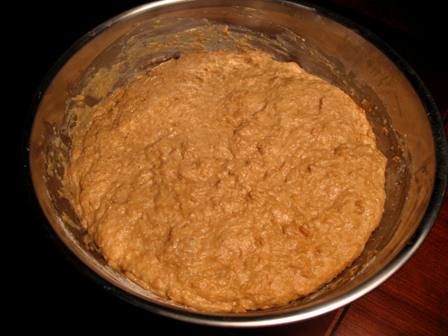
Soft Whole Wheat Sandwich Bread Dough

Soft Whole Wheat Sandwich Bread dough - after initial rise

Bread #1: Sandwich Loaf

Because this loaf gets most of its shape from a loaf pan, it’s very easy to put together. A quick shaping of the dough into a ball and then a stretch to lengthen it was all it took. I had it in the pan in less than 3 minutes. 

Whole Wheat Sandwich Loaf

Whole wheat loaf - after shaping

I wasn’t sure how much rise to expect while the loaf rested because the master loaf didn’t rise much at all, but I was excited to see the dough fill the pan before I even put it into the oven. 

Whole wheat loaf

Whole wheat sandwich loaf - after resting

I was very happy with the final loaf. It has an even and open crumb and a deep wheat flavor. My family does like wheat bread, so they were fine with the richer flavor. Even so, I think I’ll make the dough again with light wheat flour to see how that changes the flavor profile. 

Whole wheat loaf - baked

Whole wheat sandwich loaf - baked and sliced

As I was trying to think of a recipe to go with this bread, I saw that Elise from Simply Recipes recently offered up her take on cinnamon toast, a recipe that’s so simple yet has so many different possible preparations. It turns out my mother’s cinnamon toast that I grew up eating and still make for my family is indeed different from the method Elise outlines. I thought for fun I would share my mom’s “recipe” for making cinnamon toast as it was a perfect match for this hearty wheat bread. 

Bread #2: Hamburger Buns

I will admit that I had my trepidations about making hamburger buns. Now that I’ve made them, I’m not sure where they came from, but indeed they were there. Making hamburger buns is as easy as making small balls of dough and flattening them a bit with your hand to form a burger-sized round. Yep – that’s all there is too it. It took me maybe 5 minutes total to prep the pan with my slipat and shape the buns. My fourth bun was a little more evenly shaped than my first, which shows that a bit of practice is all it takes to form professional-looking hamburger buns. 

Whole wheat hamburger buns

Whole wheat hamburger buns - after shaping

Interestingly, the buns didn’t rise as much as the loaf of the same dough did, although they only rested for half of the time which might explain it. 

Whole wheat hamburger buns

Whole wheat hamburger buns - after resting

I chose to brush the buns with melted butter and skipped the sesame seeds. The resulting buns were fantastic. Like the loaf of bread they had a nice open crumb and the melted butter created a crisp crust on the top. They weren’t as light as store-bought buns, but I didn’t really expect them to be given the robustness of the loaf of bread I’d made earlier in the week. At some point I’ll confer with the group to get their thoughts on how to make a lighter bun, but for now, I’m excited to be able to make my own, particularly for those nights when we only need 3 buns instead of the 6 or 8 we usually get at the store. 

I knew that rich buns like these would need a substantial filling – both in weight and flavor. After some hunting I found a recipe for slow roasted pork on Epicurious.com. I liked the flavor profile of the pork but wanted something more low-maintenance, so I converted it into slow cooker recipe that the whole family really enjoyed. I secured a pork shoulder from a local purveyor and topped the sandwiches with locally grown micro greens and locally produced cheese. When I served the sandwiches to my family I felt I really knew the source of every single ingredient, starting and ending with the bread. 
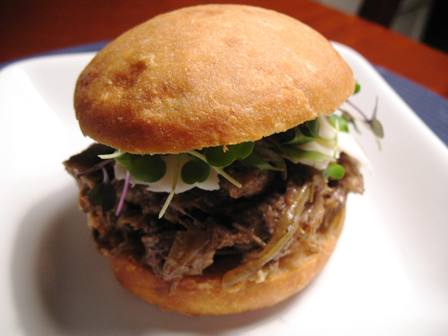
Pork and micro greens on a whole wheat bun

Slow cooked pork on freshly baked buns

Brad #3: Apple Strudel Bread

The last application of our dough was a stuffed and rolled loaf of bread mean to be reminiscent of apple strudel. The recipe calls for a filling of apples, raisins, and walnuts mixed with sugar and cinnamon. I modified the recipe to use dried cherries and sliced almonds because we prefer those flavors. It took me almost 30 minutes to prepare this loaf but that was largely due to the time it took to prep the filling. I wasn’t sure what to expect when I got ready to roll out the dough, but it rolled out very easily. 

Whole wheat dough rolled thin

Whole wheat dough rolled thin

The bread is like a giant cinnamon roll with filling spread over the dough and rolled inside. The recipe makes quite a lot of filling, particularly if the apples are big. 

Whole wheat dough with apple filling

Whole wheat dough with apple filling

The one mistake I made was not to be sure I had enough flour under the dough as I rolled so it stuck to the counter as I tried to roll it up. The result was some torn dough a slightly mangled outside exterior. I patched the holes with a bit of left over dough and I’m confident that next time I make this bread I’ll be able to get it into the pan in slightly better shape. 
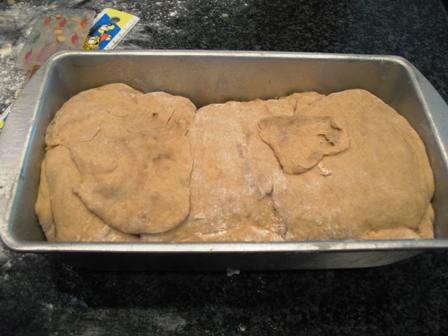
Filled dough in a loaf pan

Slighly mangled filled dough in a loaf pan

Even with my patch job, the final bread was just beautiful, particularly when sliced. It was also very tasty – not too sweet and substantial enough to be breakfast on its own along with a glass of milk and maybe a slice or two of bacon. This bread is a perfect candidate for preparing the night before and resting in the refrigerator overnight before baking the next morning. Nothing says “I love you” on a weekend morning like freshly baked bread! 

Apple strudle bread

Apple strudle bread - pretty after baking

What’s Next

Our next assignment is inspired by Valentine’s Day. We’ll be making red beet buns and chocolate espresso bread. My calendar is a little full right now with a couple of Mardi Gras parties, so I’m only planning to make the espresso bread but will squeeze in the beet buns if time allows. Until then, enjoy the recipes that my family has enjoyed with our homemade bread. 

Recipe: Cinnamon Toast

Details
 

  • Difficulty: Easy
  • Serves: 4
  • Prep Time: 5 minutes
  • Cook Time: 7 minutes

Ingredients
 

  • 8 slices whole wheat sandwich bread
  • 4 Tbsp. softened butter (light butter works well too)
  • 4 Tbsp. raw sugar (white sugar works here as well)
  • 4 tsp. cinnamon (recommend Saigon or Vietnamese)

Instructions
 

  1. Turn your oven broiler to high. If the broiler is at the top of the oven, position a rack in the position closest to the broiler.
  2. Spread butter evenly over each slice of bread.
  3. Sprinkle each slice of bread first with sugar and then with cinnamon.
  4. Place the bread slices on a baking sheet and cook under the broiler until the sugar begins to bubble and the edges of the bread are brown.

Recipe for Success
 

  • You could mix the sugar and cinnamon together before you sprinkle them on the bread, but my mother always made cinnamon toast this way so I can’t imagine having it any other way.
  • I used the bread I made for this recipe but you can use any bread you like. Lighter breads may not hold up as well to the weight of the butter, sugar, and cinnamon so choose a slightly heavier bread if you can.
  • Keep an eye on the bread while it’s under the broiler. It will go from not done to done in the blink of an eye.

Recipe: Slow Cooker Herbed Pork Sandwiches

Adapted from Hot Slow-Roasted Pork, Onion, and Mozzarella Sandwiches 

Details
 

  • Difficulty: Medium
  • Serves: 8
  • Active Prep Time: 60 minutes
  • Inactive Prep Time: 1 hour – 24 hours
  • Cook Time: 6 hours

Ingredients
 

  • 2 Tbsp. olive oil
  • 2 medium shallots, minced
  • 2 tsp. dried basil
  • 2 tsp. dried oregano
  • 1 Tbsp. fresh rosemary
  • 1 tsp. dried sage
  • 2 tsp. fennel seeds, toasted and then ground in a spice grinder
  • 1 tsp. salt
  • 1 tsp. freshly ground black pepper
  • 1 3 lb. pork shoulder or butt
  • 1 medium onion, roughly chopped
  • 1 c. white wine
  • 1 bay leaf
  • 2 c. chicken broth
  • 1 Tbsp. corn starch
  • 2 Tbsp. apple cider vinegar
  • 1 Tbsp. honey
  • Fresh mozzarella, sliced (optional)
  • Roasted red peppers, sliced (optional)
  • Micro greens (optional)

Instructions
 

  1. Combine the olive oil, shallots, basil, oregano, rosemary, sage, fennel, salt, and pepper in a small bowl. Stir to create a thick paste.
  2. With a sharp knife, make slits 1 inch long and 2 inches deep all around the pork shoulder. Rub the herb paste over all sides of the shoulder, pressing the paste down into the slits.
  3. Wrap the pork in plastic wrap and refrigerate for at least 1 hour and up to 24 hours.
  4. Add the chopped onion, white wine, and bay leaf the bottom of a slow cooker. Place the pork shoulder on top of the onion and cover with the lid.
  5. Cook on high for 6 hours or until the pork begins to fall apart.
  6. Remove the pork from the slow cooker and place in a shallow bowl or dish. Shred evenly with two forks.
  7. Drain the juices from the slow cooker into a fat separator. Pour the juices without the fat into a 2 cup measuring cup. You may only have a quarter cup or so of defatted juices.
  8. Add enough chicken broth to the measuring cup to equal 2 cups of liquid.
  9. Combine 2 Tbsp. of the liquid with the cornstarch in a small bowl and stir to combine.
  10. Pour the remaining liquid into a medium sauce pan. Add the cider vinegar and honey. Bring to a boil
  11. Whisk in the cornstarch mixture and stir over medium heat until the mixture thickens.
  12. Taste for flavor and add salt and pepper as needed.
  13. Pour the sauce over the shredded pork and toss to combine.
  14. Serve on whole wheat buns with slices of mozzarella, roasted red peppers, and micro greens.

Recipe for Success
 

  • You can also make the pork in an oven instead of a slow cooker. Bake in a tightly-covered pot at 325 degrees for 4-5 hours.
  • Make the pork up to a day ahead and warm before serving.
  • To hold warm, return the sauced pork to the slow cooker and turn it to the warm setting.
  • This recipe will easy double or triple. You’re really only limited by the size of your pot.
  • The pork will freeze beautifully for up to 3 months in a zip-top bag.
h1

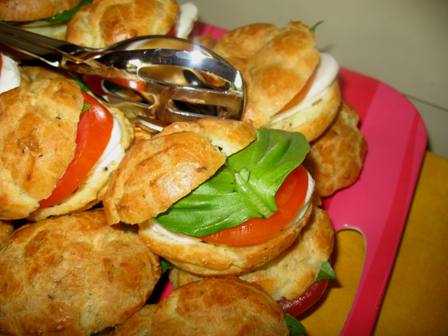
Potluck Survival with Some Help from Ratio: Caprese Sandwiches on Parmesan Gougères

May 28, 2009

CapreseGougeres[Jump right to the recipe: Caprese Sandwiches on Parmesan Gougères]

Recently, the Austin food bloggers gathered again for a potluck, giving me another blogger event to simultaneously look forward to and fret about. I of course work myself up unnecessarily. Our local blogging group is so down to earth and ready to try new food that they are possibly the easiest group of people I’ve ever fed. They also make some amazing food. See for yourself:

  • Food Blogger Potluck, The Sequel – A rundown of the event from Addie Broyles, the Statesman’s food writer extraordinaire and organizer of our foodie fun.
  • Lemon Tart – A recipe from Anna at Cookie Madness for easily the best lemon dessert I’ve ever had.
  • Potlucks and Pig-Pickinses – Welcome to Texas! – A fantastic story of not one but two food-lover events in one day from Boots In the Oven, my favorite read when I need a foodie fix and a good laugh.
  • Ethel’s Sugar Cookies – A recipe from Lisa is Cooking where you’ll gain pounds just looking at her beautiful pictures.
  • Food Blogger Pot Luck and Slow Food Austin Pot Luck – Yet another two-for-one post about local foodie events from Jennie who reminds me that it’s important to really enjoy your food.
  • Technical Difficulties – A fantastic recipe for Penne Pasta with Goat Cheese Sauce, blackberries, and pecans from Teddy at Fun With Your Food who may have had technical issues but never has issues coming up with tasty recipes.

For our last potluck I took the opportunity to really think through what makes a great dish for a potluck, and the result was my Potluck Survival Guide. For this potluck I wanted to follow all of those basic principles, but also flex my culinary muscles and put to work what I’ve learned as I’ve been reading Michael Ruhlman’s book Ratio. Finally, the pickin’s at the farmers markets these days are amazing and it seemed a shame to not make the most of some great local produce. The end result was an idea for Caprese Sandwiches on Parmesan Gougères. The caprese part of the recipe gave me a chance to showcase the best tomatoes and basil available at the market right now (both are just amazing), and the gougères element gave me a chance to test out the pâte à choux ratio from Ratio. Even though it’s a little different from my last potluck, this dish meets the requirements of my survival guide because:

  • It can be made ahead and is easy to transport.
  • It can sit safely at room temperature for a while without spoiling.
  • It’s easy to eat with one hand.

Before I dive right into the recipe, let’s take a moment to discuss one of my favorite food bites ever, gougeres.

Gougère Musings

I’ve been making gougères for a while as one of my party staples. They are exceptionally easy to make, freeze beautifully, and can support myriad flavor combinations. Pâte à choux is really (I mean really) easy to make. You cook up a little flour, water, and butter, mix in some eggs and cheese and you’re done. Really, I promise. It’s that easy. I use my Kitchen Aide to incorporate the eggs, but you can actually make them in one pan if you’re up for building some arm strength.

I think pâte à choux is often under utilized by home cooks because it seems like it should be harder than it is. My hypothesis is that any recipe that calls for a piping bag to make bread is scary. Be afraid no more! I’ve found you can skip the piping bag all together and use scoops of varying sizes to portion your balls of choux goodness. Need bite-size gougeres? Go with a 2 tsp. or 1 Tbsp. scoop. Want bigger ones; say the perfect size for little sandwiches? Try a #30 scoop. The only thing that changes in the recipe is the length of time you bake the gougères.

Seriously, if you’ve never made pâte à choux, try it. The “secrets to success” section of the recipe at the end of this post has some tips that will help you find your choux comfort zone. Ruhlman also has some great advice in Ratio, so be sure to take a look at that as well.

Choux Pastry on Foodista Learn more about choux pastry


Measuring By Volume Does Make a Difference

I’ve known for a long time that bakers who know what they’re doing always measure their ingredients by weight. You won’t typically find cups of flour called for in their recipes, but rather ounces (or possibly pounds). I even witnessed the effect the type of measuring cup and the measurer can have on the final weight of a cup of flour in a cooking class. The same measuring cup yielded flour weights between 4 and 5.5 oz depending on the person doing the measuring. In Ratio, Ruhlman is a big advocate of measuring by weight whenever possible, specifically because measures by volume can often be so inexact, and given that baking is as much of science as an art, accuracy matters.

Even though I know measuring by weight for baking is the right thing to do, I typically measure my dry ingredients for baking with a measuring cup, figuring an ounce or two here or there won’t make a difference. Boy was I wrong. When I made my parmesan gougères for this recipe, I took the time to measure all of the ingredients by volume, and these gougères were the best I’ve ever made. They were lighter, crispier, and all around more of what I’ve experienced in restaurants and other settings where the food is prepared by professional bakers and chefs. I’m officially convinced. As much as it’s sort of a pain to get the kitchen scale out to measure ingredients by volume, I can unequivocally say that it’s worth the effort for a better end product.

Ruhlman’s ratio for pâte à choux is 1 part butter, 2 parts liquid, 2 parts egg, and 1 part flour. I highly recommend snagging a copy of his book for the full scoop on how the ratios work as well downloading this hand-dandy doughs and batters ratios PDF from his site so you can print a copy and hang it on your fridge.

Pick a Flavor, Any Flavor

Once you’re comfortable making a basic pâte à choux, you’ve added a technique to your repertoire that will take you far. Pâte à choux is blank slate dough, just waiting for your favorite combination of tastes to take it from plain to yum. For the caprese sandwiches I used rosemary and parmesan to compliment the tomato, basil, and mozzarella, but that’s just a starting point. Gruyere is a traditional cheese to stir into pâte à choux dough but blue cheese is a winner and I have some suspicion a manchego and paprika gougères served with chorizo would be a truly wonderful thing. To get your creative juices flowing, here are some of my favorite gougère recipes:

Recipe: Caprese Sandwiches on Parmesan Gougères

Details

  • Difficulty: Easy (I promise)
  • Serves: Makes 18 sandwiches
  • Prep Time: 30 min
  • Cook Time: 30 min

Ingredients

  • 4 oz. water
  • 4 oz. milk (any kind will do; I use skim)
  • 4 oz. butter
  • ½ tsp. salt
  • 4 oz. flour
  • 4 large eggs (room temperature is best)
  • 1 oz. parmesan cheese, grated (about ½ cup by volume)
  • 2 tsp. minced fresh rosemary
  • 8 oz. fresh mozzarella, sliced into 16 slices
  • 6 medium tomatoes, sliced in 3-4 slices each
  • 18 basil leaves
  • Kosher salt and freshly-cracked pepper
  • Good olive oil

Instructions

Make gougères:

  1. Preheat the oven to 350 degrees.
  2. Combine milk, water, butter, and salt in a medium saucepan and bring to a boil.
  3. Add flour all at once, reduce heat to medium, and stir until the dough comes together and forms a ball.
  4. Stir and cook for one minute more.
  5. Remove from heat, cover, and let stand for five minutes.
  6. Transfer dough to a stand mixer fitted with a paddle.
  7. Mix the dough on medium-low for 1-2 minutes or until the steam released from the hot dough decreases significantly.
  8. Add the eggs one at a time, letting each fully incorporate before adding the next.
  9. Add the cheese and rosemary; mix until combined.
  10. Scoop onto a parchment or slipat lined baking sheet using the scoop of your choice.
  11. Dampen fingertips with water and smooth down any peaks in the dough.
  12. Bake for 20-30 minutes depending on size of the scoop (20-25 minutes for smaller gougeres and 30 for larger).
  13. Remove gougères from the oven and:
    • Serve immediately
    • Poke a hole in each gougère with a toothpick or skewer and let cool before holding for service in 24-48 hours or freezing.

Assemble sandwiches:

  1. Split each gougère in half.
  2. Top the bottom with a slice of mozzarella and tomato and a basil leaf.
  3. Season with salt and pepper then drizzle with olive oil.
  4. Top with the remaining half and serve.

Recipe for Success

  • When you’re making pâte à choux, it’s important that the butter/four/liquid mixture not be too hot, otherwise you’ll scramble the eggs when you add them. The five minutes the dough spends before you put it into the mixer and the 1-2 minutes of mixing time before you add the eggs, help the dough cool off enough to take on the eggs without scrambling them. Even if you’re tempted to save the 6-7 minutes, don’t.
  • You can make the gougères up to 3 weeks in advance. After they cool, put them on a baking sheet in the freezer for an hour to set and then place them in a heavy-duty zip-top bag and freeze. To bring them back to life, place them in a 350 degree oven for 10-12 minutes. This is true of any gougere recipe, not just this one. This is in fact why I like gougères so much for parties. You can cook up batches of them one weekend and quickly reheat when it’s time for the party.
  • If you’re in a hurry or just don’t want to try the whole pâte à choux thing, this recipe works equally well with the bread of your choice. Consider toasted sourdough, whole wheat, or rosemary bread.
  • Play around with the combination of flavors on the sandwich. Prosciutto might be a nice addition or you can build your own unique combination of flavors with the cheese, veggies, and meat of your choice. The options are really limitless.
  • Because the pâte à choux is based on a ratio, you can easily double it (or triple it and more) by modifying the ratios. A double batch would have 8 oz. each of water and milk, 8 oz. of butter, 8 oz. of flour, and 8 large eggs. You could double the parmesan and rosemary as well, or play around with the amounts you use to tweak the final flavor of the gougère.

Tools of the Trade

These kitchen tools were important to this recipe. You may want to consider adding them to your collection if you don’t have them already.

  • Digital Kitchen Scale. Slect a scale that displays both grams and ounces. A tare feature is also important so you can measure directly into the container of your choice.
  • Silpat Nonstick Silicone Baking Mat. While different cooks have their own opinion of silicon baking mats, I’ve found them to be indespensible in the kitchen and use them for most of my baking activities.
  • Size 30 Disher and Size 60 Disher. Dishers not only help you skip the piping bag in this recipe, but they make portioning cookies, muffins, ice cream, and all number of other foods much easier than a spoon ever can.
h1

Farmer’s Market Bounty: Meat, Cheese, and Tomatoes, Oh My!

April 27, 2009

farmersmarket[Jump right to the recipe: Prosciutto and Mozzarella Flat Bread with Fresh Tomato]

I’ve been making a concerted effort to get down to the Austin Farmer’s Market at least a couple of times a month if not weekly so I can support local farmers and lay hands on the fresh-picked food just like my grandmother’s garden produced when I was a child. When I bring my purchases home and feed my family I somehow feel that I’ve helped complete a very important circle of life.

What I love most about any farmer’s market is that the array of offerings goes so far beyond fruits and veggies. At our farmers market you can find breakfast tacos, fresh made bread, pizza, and even flowers. On a recent weekend trip I filled my bag with some amazing local meats, including:

My favorite new (to me) find this week was Brazos Valley Cheese made by hand up the road in Waco at Homestead Farms. They buy their milk locally, which is an added bonus. Their selection includes both soft and hard cheeses and they seem to enjoy flavoring cheeses with things like sage, rosemary, and garlic. While I tasted many cheeses and, if I’m wholly honest with myself, would have loved to have brought some of each home, I kept my head and limited myself to their Marinated Mozzarella. This lovely soft cheese is nestled happily in olive oil and a nice collection of Italian spices. By itself it’s wonderful for snacking, but paired with the oh-so-in-season tomatoes and basil that are in abundance at the market, well, it’s farm food heaven.

I’ve found that the best way to give fresh, local ingredients their proper due is to let their flavors shine through without much mucking about. This recipe is one that I’ve had not once but twice in as many days tries to do just that. The list of ingredients is short and the success of the dish relies 100% on those ingredients being fresh and good. Don’t try this recipe in winter when tomatoes aren’t in season – you’ll be disappointed. And really, I wouldn’t try this with anything but a vine-ripened tomato that you know wasn’t picked until exactly ready to eat.

Recipe: Prosciutto and Mozzarella Flat Bread with Fresh Tomato

flatbreadtomato

This recipe riffs off of my favorite techniques for quickly creating flat bread of all types: using pre-made pita bread in place of pizza dough. I use pita bread as the base for quick grilled pizza and it works just as well here. Many pitas are whole-wheat and low-fat (be sure to read the label) and can provide a healthier alternative to traditional pizza dough. They have the added bonus of being already made and baked too, which makes them a great helper when you need a quick meal. However, if you have a favorite pizza dough recipe you can use that as well.

Details

  • Difficulty: Easy
  • Serves: Makes 1 pizza
  • Active Prep Time: 15 min
  • Cook Time: 10 min
  • Weight Watchers™ Points: 10*

Ingredients

  • 1 large pita bread (my favorite local brand is Phoenicia)
  • 2 oz fresh mozzarella, sliced thin
  • 3 thin slices of prosciutto, about 1 oz, roughly chopped
  • 1 medium vine-ripened tomato, cut into 8 wedges
  • 2 large basil leaves, cut into a chiffonade
  • Salt and pepper to taste
  • 2 tsp. good olive oil

Instructions

  1. Preheat a grill or grill pan on high until smoking hot.
  2. Place the pita on the grill and let warm for 2 minutes, or until grill marks just start to show on one side of the pita.
  3. Flip the pita with tongs and reduce the heat to medium-high.
  4. Distribute the mozzarella evenly over the pita.
  5. Close the grill lid (or cover the grill pan with a lid or foil) for 2-3 minutes, or until the cheese just begins to melt.
  6. Sprinkle the prosciutto over the mozzarella, cover, and cook for an additional 1-2 minutes, or until the mozzarella is melted and the prosciutto is warmed through.
  7. Transfer to a cutting board and let set for a minute before cutting into wedges.
  8. Place the tomato in the middle of a plate. Sprinkle liberally with salt and pepper. Drizzle with olive oil and garnish with the basil. Surround with slices of the flat bread and serve.

Recipe for Success

  • When I made this recipe I used marinated mozzarella, but you can use any type. I recommend fresh mozzarella because of its un-rivaled creaminess, but in a pinch you can use block or pre-shredded. You can also throw some parmesan cheese in (no green cans please) for a little extra bite.
  • To make it easier to slice the mozzarella, put it into the freezer for a few minutes.
  • I often my flat bread on a cast-iron grill pan inside because it is easier than trekking out to the grill on the porch. However, if I’m making lots of flat bread at once, the grill is the way to go. This is also a fun way to cook food on the porch or deck while hanging out with your friends.
  • I like my prosciutto just warm and not crisp. If you like crisp prosciutto put it onto the flat bread when you first add the mozzarella. It will crisp up nicely as the cheese melts.

*Points Details

  • Like my other pita pizza recipe, this dish is enough for an entire meal for one person. You can also split it with someone for 5 points and add a 2 point salad for a slightly lower-point meal.

Clearly I’m enjoying my farmer’s market shopping and cooking. What’s your favorite farmer’s market find and what did you make with it?

Manchego on Foodista Learn more about mozzarella